
Introduction
Instagram has become one of the most popular social media apps in the world. With millions of users, it’s not surprising that some people have multiple accounts. However, managing multiple accounts can be tricky, and sometimes you may want to delete one or more of your accounts. In this article, we will show you how to delete multiple Instagram accounts on your iPhone.
Step-by-Step Guide
Deleting multiple Instagram accounts on an iPhone is a simple process. Follow these steps:
Step 1: Open Instagram

The first step is to open the Instagram app on your iPhone. Make sure you are logged in to the account you want to delete.
Step 2: Go to Your Profile

Next, tap on your profile icon in the bottom right-hand corner of the screen. This will take you to your profile page.
Step 3: Tap on the Three Lines

Tap on the three lines in the top right-hand corner of the screen. This will take you to the Instagram menu.
Step 4: Go to Settings
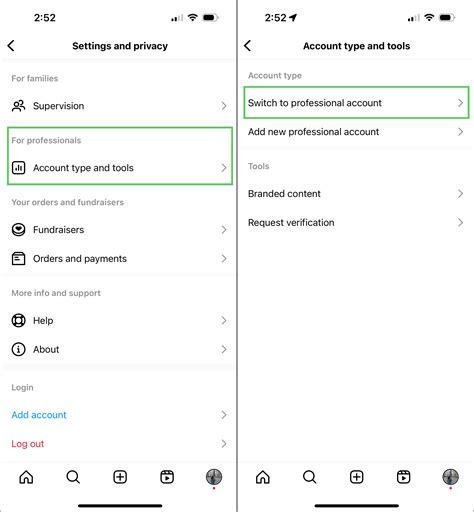
Scroll down the menu until you see the “Settings” option. Tap on it to go to your Instagram settings.
Step 5: Tap on “Log Out of [Username]”
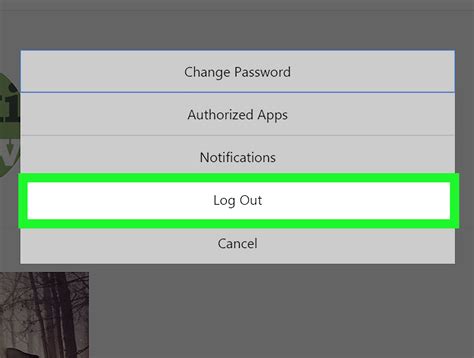
Under the “Account” section, you will see a list of all the accounts you are logged in to. Tap on “Log Out of [Username]” for the account you want to delete.
Step 6: Confirm Deletion
Instagram will ask you to confirm that you want to log out of the account. Tap “Yes” to confirm that you want to delete the account.
Conclusion
Deleting multiple Instagram accounts on your iPhone is a straightforward process. By following these simple steps, you can easily manage your Instagram accounts and delete any accounts you no longer need.
Related video of Supprimer Multi-Compte Instagram iPhone
If you're looking to remove Google Chrome from your Android device, you're in the right place. Whether you're looking to free up some storage space or just want to switch to a different browser, we've got you covered. In this article, we'll guide you through the process of uninstalling Chrome from your Android device.
Why Remove Chrome from Your Android Device?
Google Chrome is one of the most popular web browsers in the world. It's fast, secure, and offers a lot of features that make browsing the web on your Android device a breeze. However, there are some instances where you may want to remove Chrome from your device:
- You're running low on storage space
- You want to switch to a different browser
- You're experiencing issues with Chrome
If any of these apply to you, then it's time to remove Chrome from your Android device.
How to Uninstall Chrome from Your Android Device
The process of uninstalling Chrome from your Android device is straightforward. Here's how to do it:
- Open the Settings app on your Android device
- Scroll down and tap on Apps & notifications
- Tap on See all apps
- Scroll down until you find Google Chrome
- Tap on Google Chrome
- Tap on Uninstall
- Tap on OK to confirm
That's it! Chrome has been successfully uninstalled from your Android device.
What to Do If You Can't Uninstall Chrome
In some cases, you may encounter issues when trying to uninstall Chrome from your Android device. Here are some solutions to common issues:
Chrome Is a System App
If Chrome came pre-installed on your device, it may be classified as a system app. In this case, you won't be able to uninstall Chrome using the method outlined above. Instead, you can disable Chrome:
- Open the Settings app on your Android device
- Scroll down and tap on Apps & notifications
- Tap on See all apps
- Scroll down until you find Google Chrome
- Tap on Google Chrome
- Tap on Disable
- Tap on OK to confirm
This will remove Chrome from your app drawer and prevent it from running in the background.
The Uninstall Button Is Grayed Out
If the Uninstall button is grayed out when you try to uninstall Chrome, it may be because Chrome is set as the default browser on your device. To fix this:
- Open the Settings app on your Android device
- Scroll down and tap on Apps & notifications
- Tap on See all apps
- Tap on Chrome
- Tap on Set as default
- Tap on Clear defaults
- Tap on OK
Now you should be able to uninstall Chrome using the method outlined above.
Alternatives to Chrome on Android
If you've decided to remove Chrome from your Android device, you may be wondering what your alternatives are. Here are some popular browsers for Android:
- Firefox
- Opera
- Microsoft Edge
- Samsung Internet
- DuckDuckGo Privacy Browser
Each of these browsers offers unique features and benefits, so it's worth trying out a few to see which one fits your needs best.
Conclusion
Removing Chrome from your Android device is a simple process. If you encounter any issues, follow the solutions outlined in this article. And if you're looking for an alternative browser, there are plenty of great options to choose from.
Related video of Supprimer Chrome Android: How to Uninstall Google Chrome on Your Android Device
What is Story a la Une Facebook?
Story a la Une Facebook is a feature of the popular social media platform that allows users to discover the most popular news and articles that are being shared on Facebook. The feature is located in the News Feed section of the site and is designed to help users stay up-to-date with the latest news and trends that are being discussed on the platform.
How Does Story a la Une Facebook Work?
When a user logs into Facebook and goes to the News Feed section, they will see a section called "Story a la Une" located on the right-hand side of the screen. This section features a list of articles and news stories that are currently trending on the platform. The stories are ranked based on a variety of factors, including how many times they have been shared, how many people have commented on them, and how many people have reacted to them.
Users can click on any story in the "Story a la Une" section to read the full article. They can also share the article with their friends and followers by clicking on the "Share" button located below the article.
Why is Story a la Une Facebook Important?
Story a la Une Facebook is an important tool for staying informed about the latest news and trends that are being discussed on the platform. With so much content being shared on Facebook every day, it can be difficult to know what is important and what isn't. The "Story a la Une" section helps users cut through the noise and discover the most relevant and interesting content on the platform.
Additionally, Story a la Une Facebook is also important for publishers and media outlets. Being featured in the "Story a la Une" section can help drive traffic to their websites and increase their visibility on the platform. This can ultimately lead to more clicks, more shares, and more revenue for these publishers.
How Can You Use Story a la Une Facebook?
If you're looking to stay up-to-date with the latest news and trends on Facebook, Story a la Une Facebook is a great tool to use. Simply log into your account and visit the News Feed section to see the latest stories that are being shared on the platform.
If you're a publisher or media outlet, you can also use Story a la Une Facebook to increase your visibility on the platform. By creating high-quality content that resonates with Facebook users, you can increase your chances of being featured in the "Story a la Une" section and drive more traffic to your website.
Conclusion
Story a la Une Facebook is a powerful tool for discovering the most popular articles and news stories on the platform. Whether you're looking to stay informed about the latest trends or increase your visibility as a publisher, this feature can help you achieve your goals. So the next time you log into Facebook, be sure to check out the "Story a la Une" section and discover the latest and greatest content on the platform.
Related video of Story a la Une Facebook: A Tool for Discovering the Most Popular Articles on Facebook
What is Sommaire Automatique Google Doc?
Sommaire Automatique Google Doc is a feature that allows you to create an automatic table of contents in your Google document. This feature is especially useful for longer documents, such as reports, theses, and dissertations, where a table of contents can help readers navigate through the document.
How to Use Sommaire Automatique Google Doc
To create an automatic table of contents in your Google document, follow these simple steps:
- Place your cursor where you want to insert the table of contents.
- Click on "Insert" and select "Table of contents" from the dropdown menu.
- Choose the style of the table of contents from the options available.
- Your table of contents will be inserted automatically, and will update itself as you add, delete, or move sections in your document.
The Benefits of Using Sommaire Automatique Google Doc
Sommaire Automatique Google Doc offers several benefits:
- It saves time: creating a table of contents manually can be time-consuming, especially for longer documents. With this feature, you can create a table of contents with just a few clicks.
- It ensures accuracy: manually creating a table of contents can lead to errors, such as misspelled headings or incorrect page numbers. With this feature, the table of contents is created automatically, ensuring accuracy.
- It makes navigation easier: a table of contents makes it easier for readers to navigate through your document and find the information they need.
Customizing Your Table of Contents
Sommaire Automatique Google Doc offers several options for customizing your table of contents:
- You can choose the style of the table of contents from the options available.
- You can choose which headings to include in the table of contents.
- You can change the font, size, and color of the text in the table of contents.
Tips for Using Sommaire Automatique Google Doc
Here are some tips for using Sommaire Automatique Google Doc:
- Make sure your headings are formatted correctly: the table of contents is created based on the headings in your document, so it's important to format them correctly. Use the "Heading 1," "Heading 2," etc. styles to format your headings.
- Update your table of contents regularly: as you add, delete, or move sections in your document, make sure to update your table of contents.
- Preview your table of contents before finalizing: preview your table of contents to make sure it looks the way you want it to.
Conclusion
Sommaire Automatique Google Doc is a useful feature that can save you time and ensure accuracy when creating a table of contents in your Google document. With a few simple clicks, you can create a professional-looking table of contents that makes navigation through your document a breeze. Remember to format your headings correctly, update your table of contents regularly, and preview before finalizing.
Related video of Sommaire Automatique Google Doc: Making Your Life Easier
What is Halo Infinite?
Halo Infinite is the latest installment in the Halo franchise, developed by 343 Industries and published by Xbox Game Studios. It is an upcoming first-person shooter game that will be released for Xbox Series X/S, Xbox One, and Microsoft Windows in 2021.
What is a Serveur Halo Infinite?
A Serveur Halo Infinite is a server that allows players to connect and play Halo Infinite together online. These servers are community-driven and usually run by fans of the game. They provide a platform for players to connect and compete with each other.
How to Join a Serveur Halo Infinite?
Joining a Serveur Halo Infinite is easy. All you need to do is find a server that you want to join and connect to it using the game's multiplayer menu. You can search for servers based on their location, game mode, and other factors. Once you are connected, you can start playing with other players.
What are the Benefits of Joining a Serveur Halo Infinite?
Joining a Serveur Halo Infinite has many benefits. First, it allows you to connect with other players who share your passion for the game. You can form friendships and build a community around the game. Second, it allows you to play the game in a more competitive environment. You can test your skills against other players and improve your gameplay. Finally, it allows you to have more fun with the game. Playing with other players can be more enjoyable than playing alone.
What are the Different Types of Serveur Halo Infinite?
There are many different types of Serveur Halo Infinite. Some servers focus on specific game modes, such as Team Deathmatch or Capture the Flag. Others focus on specific maps or customization options. Some servers are dedicated to competitive play, while others are more casual. It's up to you to decide which type of server you want to join.
How to Create Your Own Serveur Halo Infinite?
If you want to create your own Serveur Halo Infinite, you can do so by following these steps:
- Download and install the Halo Infinite Server software from the official website.
- Configure the server settings, including game mode, map rotation, and other options.
- Set up port forwarding on your router to allow other players to connect to your server.
- Advertise your server on forums, social media, and other platforms.
With these steps, you can create your own Serveur Halo Infinite and start playing with other players.
What are the System Requirements for Halo Infinite?
The system requirements for Halo Infinite are as follows:
- OS: Windows 10 (64-bit)
- Processor: Intel Core i5-3450 or AMD Ryzen 3
- Memory: 8 GB RAM
- Graphics: Nvidia GeForce GTX 1050 Ti or AMD Radeon RX 560
- DirectX: Version 12
- Network: Broadband Internet connection
- Storage: 50 GB available space
What are the New Features in Halo Infinite?
Halo Infinite introduces many new features to the franchise, including:
- A new open-world environment for players to explore
- A grappling hook that allows players to move around the environment more easily
- A new AI companion named "The Weapon"
- A new multiplayer progression system that rewards players for their achievements
- Improved graphics and sound design
What are the Game Modes in Halo Infinite?
Halo Infinite features several different game modes, including:
- Team Deathmatch
- Capture the Flag
- Oddball
- King of the Hill
- Slayer
- Big Team Battle
- Free-for-All
When is Halo Infinite Release Date?
Halo Infinite is set to be released in 2021. The exact release date has not been announced yet, but it is expected to be sometime in the fall.
What are the Pre-order Bonuses for Halo Infinite?
Players who pre-order Halo Infinite will receive the following bonuses:
- A special armor coating for the Mark VII Spartan armor
- A special weapon coating for the VK78 Commando rifle
- A unique visor for the Mark VII Spartan helmet
Conclusion
Overall, Serveur Halo Infinite provides an exciting opportunity for players to connect and play together online. Whether you are a fan of the franchise or a newcomer, joining a Serveur Halo Infinite can enhance your gameplay experience and provide hours of fun.
Related video of Serveur Halo Infinite: Everything You Need to Know
WhatsApp is a popular instant messaging app that allows users to send and receive messages, photos, videos, documents, and voice messages. With millions of users worldwide, WhatsApp has become an essential communication tool for both personal and business use. It's essential to back up your WhatsApp data regularly to avoid losing your valuable messages and media files. In this article, we will explain how to perform a sauvegarde WhatsApp iCloud, which is a backup process that saves your WhatsApp data to your iCloud account.
What is iCloud?
iCloud is a cloud storage and computing service provided by Apple Inc. It allows users to store and access their data from anywhere, including photos, music, documents, and other files. iCloud also offers backup services for iOS devices, including iPhones, iPads, and iPods. You can use iCloud to back up your WhatsApp data to ensure that your messages and media files are secure and accessible from any device.
How to Perform a Sauvegarde WhatsApp iCloud
To sauvegarde WhatsApp iCloud, you need to follow these simple steps:
- Open WhatsApp on your iPhone.
- Tap on Settings in the bottom right corner.
- Select Chats from the list of options.
- Tap on Chat Backup.
- Tap on Back Up Now to start the sauvegarde WhatsApp iCloud process.
WhatsApp will start the backup process, which may take a few minutes, depending on the size of your WhatsApp data. You can also set up automatic backups by selecting Auto Backup and choosing the frequency of backups.
How to Restore Your WhatsApp Data from iCloud
If you need to restore your WhatsApp data from iCloud, follow these steps:
- Uninstall WhatsApp from your iPhone.
- Reinstall WhatsApp from the App Store.
- Open WhatsApp and verify your phone number.
- When prompted, tap on Restore Chat History.
- WhatsApp will start restoring your chat history from iCloud.
Why Backup Your WhatsApp Data?
Backing up your WhatsApp data is essential for several reasons:
- Protect your data from loss or damage.
- Ensure that you can access your WhatsApp messages and media files from any device.
- Transfer your WhatsApp data to a new phone or device quickly and easily.
- Restore your WhatsApp data if you accidentally delete the app or lose your device.
Conclusion
Sauvegarde WhatsApp iCloud is a simple and effective way to backup your WhatsApp messages and media files. With iCloud, you can ensure that your data is secure and accessible from any device. By following the steps outlined in this article, you can perform a sauvegarde WhatsApp iCloud and restore your WhatsApp data if necessary. Don't forget to back up your WhatsApp data regularly to protect your valuable messages and media files.
Related video of Sauvegarde WhatsApp iCloud: How to Backup Your WhatsApp Messages on iCloud
Have you ever accidentally rotated your screen on your Windows 10 PC and didn't know how to fix it? Or maybe you just want to rotate your screen for a better viewing experience? Whatever the reason may be, rotating your screen on Windows 10 is a simple process that can be done in just a few steps.
Method 1: Using Keyboard Shortcuts
One of the easiest ways to rotate your screen on Windows 10 is by using keyboard shortcuts. Follow these steps to rotate your screen using keyboard shortcuts:
- Hold down the Ctrl and Alt keys on your keyboard.
- While holding down the Ctrl and Alt keys, press either the left or right arrow key to rotate your screen accordingly.
If you want to rotate your screen back to its original position, simply press the Ctrl, Alt, and up arrow keys at the same time.
Method 2: Using Display Settings
If you prefer to use your mouse to rotate your screen, you can also do so through the Display settings. Follow these steps:
- Right-click on your desktop and select Display settings.
- Scroll down to the Orientation section.
- Click on the drop-down menu and select the desired orientation. You can choose from Landscape, Portrait, Landscape (flipped), and Portrait (flipped).
- Click Apply to save the changes.
If you're not sure which orientation to choose, you can click on the Orientation drop-down menu and select Rotate to portrait or Rotate to landscape to see a preview of how your screen will look.
Method 3: Using Graphics Card Settings
If you have a dedicated graphics card, you may also be able to rotate your screen through the graphics card settings. Here's how:
- Right-click on your desktop and select Graphics Properties or NVIDIA Control Panel (depending on your graphics card).
- Look for the Rotation or Orientation option.
- Select the desired orientation.
- Click Apply to save the changes.
Note that not all graphics cards support screen rotation, so this option may not be available for you.
Conclusion
Rotating your screen on Windows 10 can be done in just a few clicks or keystrokes. Whether you prefer to use keyboard shortcuts, Display settings, or graphics card settings, you can easily rotate your screen to fit your needs. So go ahead and experiment with different orientations to find the one that works best for you!
Related video of Rotation Écran PC Windows 10: How to Rotate Your Screen on Windows 10
Having a reliable and secure local network is essential for staying connected and productive, whether you're at home or in the office. If you're an iPhone user, you might be wondering how you can connect your device to a local network.
What is a Local Network?
A local network, also known as a LAN (Local Area Network), is a group of connected devices that share resources and communicate with one another within a limited area. In most cases, a local network is set up within a home or office environment, using a router to manage the connections between devices.
Why Connect Your iPhone to a Local Network?
Connecting your iPhone to a local network has several benefits, including:
- Access to high-speed internet
- Ability to connect to other devices on the network
- Increased security compared to public networks
- Ability to share files and resources with other devices on the network
How to Connect Your iPhone to a Local Network
Connecting your iPhone to a local network is a simple process, and can be done in just a few steps:
- Open the Settings app on your iPhone
- Select Wi-Fi
- Toggle on the Wi-Fi switch if it is not already on
- Select the name of your local network from the list of available networks
- Enter the password for your local network if prompted
- Wait for your iPhone to connect to the local network
Troubleshooting Tips
If you're having trouble connecting your iPhone to a local network, try the following troubleshooting tips:
- Make sure your iPhone is within range of the local network
- Check that your local network is set up and functioning properly
- Restart your iPhone and try connecting again
- Reset your network settings by going to Settings > General > Reset > Reset Network Settings
Conclusion
Connecting your iPhone to a local network is an important step in staying connected and productive. By following the steps above, you can easily connect your device to a local network and enjoy all the benefits that come with it.
Related video of Réseau Local iPhone: How to Connect Your iPhone to a Local Network
Introduction
Youtube is one of the most popular video sharing platforms in the world. It has millions of users who watch and share videos every day. Watching Youtube videos on a big screen TV can enhance the viewing experience. Samsung TVs are known for their high-quality screens and advanced features. In this article, we will discuss how to watch Youtube on Samsung TV.
Method 1: Using the Youtube App on Samsung TV
Samsung TVs come with the Youtube app pre-installed. You can easily access it by pressing the Smart Hub button on your Samsung remote. Once the Smart Hub is open, navigate to the Youtube app using the arrow keys and press the enter button to launch it.
You will now be able to browse and watch Youtube videos on your Samsung TV. You can use the remote to search for videos, pause, play, and adjust the volume.
Method 2: Using a Streaming Device
If your Samsung TV does not have the Youtube app or if you prefer to use a different device to stream videos, you can use a streaming device such as Roku, Apple TV, or Chromecast.
Connect the streaming device to your Samsung TV using an HDMI cable. Follow the setup instructions for the device and download the Youtube app on the device. You can now watch Youtube videos on your Samsung TV using the streaming device.
Method 3: Casting Youtube from a Smartphone or Tablet
You can also cast Youtube videos from your smartphone or tablet to your Samsung TV. This method is useful if you want to watch a video that is not available on the Youtube app on your Samsung TV.
To cast Youtube from your smartphone or tablet, make sure your Samsung TV and your device are connected to the same Wi-Fi network. Open the Youtube app on your device and select the video you want to watch.
Tap on the cast icon on the top right corner of the app and select your Samsung TV from the list of available devices. The video will now start playing on your Samsung TV. You can control the playback using your smartphone or tablet.
Conclusion
Watching Youtube on Samsung TV is easy and convenient. You can use the Youtube app on your Samsung TV, a streaming device, or cast videos from your smartphone or tablet. Choose the method that works best for you and enjoy your favorite Youtube videos on the big screen.