Les notifications sont un élément clé de l'expérience utilisateur sur un iPhone. Elles permettent de savoir rapidement si vous avez reçu un message, un appel manqué ou une alerte d'application. Cependant, si vous avez activé la fonctionnalité de verrouillage de votre téléphone, vous ne pourrez pas voir les notifications sans déverrouiller votre appareil. Dans cet article, nous allons vous montrer comment afficher les notifications sur l'écran de verrouillage de votre iPhone.
Activer les Notifications sur l'Écran de Verrouillage
Pour activer les notifications sur l'écran de verrouillage de votre iPhone, vous devez suivre les étapes suivantes :
- Ouvrez les Paramètres de votre iPhone.
- Appuyez sur Notifications.
- Faites défiler jusqu'à la section Afficher à l'écran verrouillé.
- Activez l'option Afficher les notifications.
Une fois que vous avez activé cette option, vous pourrez voir les notifications sur l'écran de verrouillage de votre iPhone.
Afficher les Notifications sur l'Écran de Verrouillage
Pour afficher les notifications sur l'écran de verrouillage de votre iPhone, vous devez suivre les étapes suivantes :
- Allumez votre iPhone.
- Vérifiez que l'écran est verrouillé.
- Attendez que la notification s'affiche sur l'écran de verrouillage.
- Appuyez sur la notification et faites-la glisser vers la droite.
En faisant glisser la notification vers la droite, vous pouvez accéder à la fonctionnalité de réponse rapide pour répondre à un message ou à un appel manqué directement depuis l'écran de verrouillage.
Personnaliser les Notifications sur l'Écran de Verrouillage
Si vous souhaitez personnaliser les notifications sur l'écran de verrouillage de votre iPhone, vous devez suivre les étapes suivantes :
- Ouvrez les Paramètres de votre iPhone.
- Appuyez sur Notifications.
- Faites défiler jusqu'à la section Afficher à l'écran verrouillé.
- Sélectionnez l'application pour laquelle vous souhaitez personnaliser les notifications.
- Personnalisez les paramètres de notification selon vos préférences.
En personnalisant les paramètres de notification pour chaque application, vous pouvez choisir quelles notifications seront affichées sur l'écran de verrouillage de votre iPhone et comment elles seront affichées.
Désactiver les Notifications sur l'Écran de Verrouillage
Si vous ne souhaitez pas afficher les notifications sur l'écran de verrouillage de votre iPhone, vous devez suivre les étapes suivantes :
- Ouvrez les Paramètres de votre iPhone.
- Appuyez sur Notifications.
- Faites défiler jusqu'à la section Afficher à l'écran verrouillé.
- Désactivez l'option Afficher les notifications.
En désactivant cette option, vous ne verrez plus les notifications sur l'écran de verrouillage de votre iPhone.
Conclusion
Avec ces étapes simples, vous pouvez afficher, personnaliser ou désactiver les notifications sur l'écran de verrouillage de votre iPhone. En personnalisant les paramètres de notification pour chaque application, vous pouvez choisir quelles notifications sont importantes pour vous et les afficher sur l'écran de verrouillage de votre iPhone. En suivant ces étapes, vous pouvez profiter d'une expérience utilisateur améliorée sur votre iPhone.
Related video of Comment Afficher les Notifications sur l'Écran de Verrouillage iPhone

Instagram è una delle piattaforme social più popolari al mondo, con oltre un miliardo di utenti attivi ogni mese. Una delle funzioni più amate di Instagram sono le storie, che consentono agli utenti di condividere momenti della loro vita quotidiana con amici e seguaci. Ma cosa succede se le storie non funzionano o non si riescono ad aprire? In questo articolo, ti mostreremo come riattivare le storie Instagram.
Controlla la connessione Internet
La prima cosa da fare quando si hanno problemi con le storie Instagram è controllare la propria connessione Internet. Assicurati di essere connesso a una rete Wi-Fi o a una connessione dati mobile stabile. Se la tua connessione Internet è debole o instabile, potresti avere difficoltà ad aprire le storie Instagram.
Aggiorna l'app Instagram
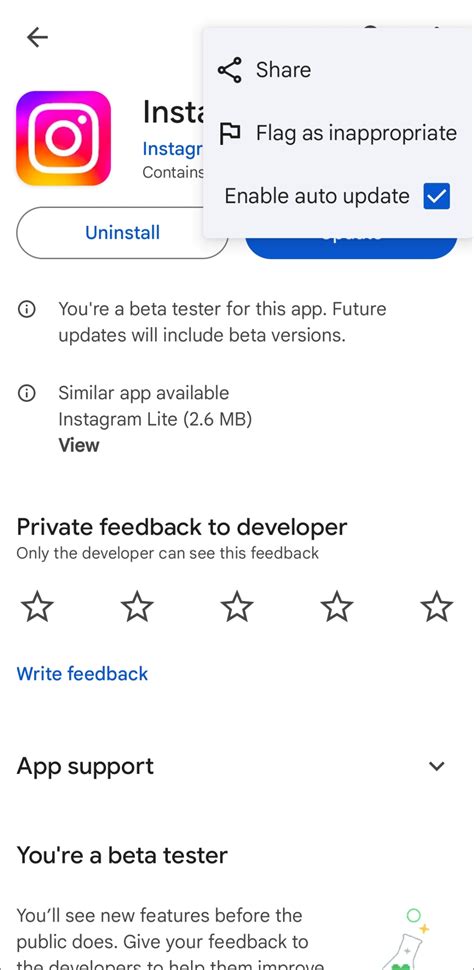
Se la tua app Instagram non è aggiornata, potrebbe non funzionare correttamente. Assicurati di aver installato l'ultima versione dell'app Instagram sul tuo dispositivo. Per verificare se hai l'ultima versione, vai su App Store (per iOS) o Play Store (per Android) e cerca l'app Instagram. Se c'è un pulsante "Aggiorna" accanto all'app, toccalo per installare l'aggiornamento.
Riavvia l'app Instagram
Se la tua app Instagram non funziona correttamente, potrebbe essere utile riavviarla. Chiudi completamente l'app Instagram e riaprila. Questo potrebbe risolvere il problema e consentirti di accedere alle tue storie.
Cancella la cache e i dati dell'app Instagram

La cache e i dati dell'app Instagram possono accumularsi nel tempo e causare problemi di prestazioni. Per risolvere questo problema, prova a cancellare la cache e i dati dell'app Instagram. Vai su Impostazioni > App > Instagram > Archiviazione e tocca "Cancella cache" e "Cancella dati". Dopo aver cancellato la cache e i dati, riavvia l'app Instagram e prova ad accedere alle tue storie.
Disinstalla e reinstalla l'app Instagram
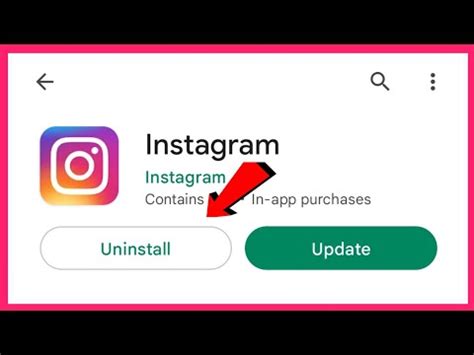
Se tutte le altre soluzioni non funzionano, potrebbe essere necessario disinstallare e reinstallare l'app Instagram. Questo cancellerà tutti i dati dell'app e ripristinerà le impostazioni predefinite. Assicurati di aver effettuato il backup dei tuoi dati importanti prima di disinstallare l'app. Dopo aver reinstallato l'app, accedi al tuo account e prova ad accedere alle tue storie.
Assicurati di avere un account Instagram attivo

Se il tuo account Instagram è stato disattivato o è stato sospeso, potresti non essere in grado di accedere alle tue storie. Verifica lo stato del tuo account Instagram sul sito ufficiale di Instagram o contatta il supporto tecnico per ulteriori informazioni.
Verifica le impostazioni delle tue storie Instagram
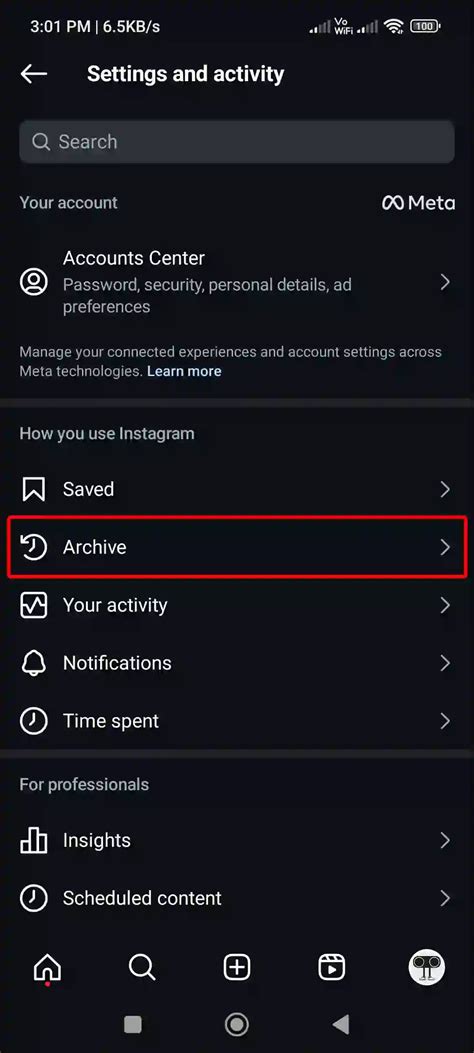
Assicurati di aver impostato correttamente le tue storie Instagram. Vai su Impostazioni > Privacy > Storie e verifica che le tue impostazioni siano corrette. Potresti aver accidentalmente disattivato le storie per un certo periodo di tempo o averle rese disponibili solo per un gruppo ristretto di amici.
Contatta il supporto tecnico di Instagram
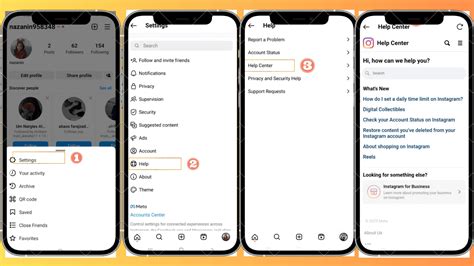
Se tutte le altre soluzioni non funzionano, contatta il supporto tecnico di Instagram per ulteriori informazioni e assistenza. Il supporto tecnico di Instagram è disponibile tramite la sezione "Assistenza" dell'app Instagram o sul sito ufficiale di Instagram.
Conclusione
Le storie Instagram sono una funzione divertente e utile che consente agli utenti di condividere momenti della loro vita quotidiana con amici e seguaci. Se le tue storie Instagram non funzionano correttamente, segui questi passaggi per risolvere il problema. Ricorda di controllare la tua connessione Internet, aggiornare l'app Instagram, riavviare l'app, cancellare la cache e i dati dell'app, disinstallare e reinstallare l'app, verificare lo stato del tuo account Instagram e contattare il supporto tecnico di Instagram se necessario.
Related video of Come Riattivare Storie Instagram
Netflix is a popular streaming service that offers a wide range of movies and TV shows. However, not all of the content is suitable for all ages. This is where parental controls come in. In this article, we will discuss everything you need to know about Code Parental Netflix.
What is Code Parental Netflix?
Code Parental Netflix is a feature that allows parents to set restrictions on what their children can watch on the streaming service. This feature is available for all Netflix accounts and can be accessed through the settings menu.
With Code Parental Netflix, parents can set up individual profiles for each child and choose the content that is appropriate for their age. This feature is particularly useful for families with children of different ages who have different interests.
How to Set Up Parental Controls on Netflix
Setting up parental controls on Netflix is easy. Here are the steps you need to follow:
- Log in to your Netflix account.
- Click on your profile picture in the top-right corner of the screen.
- Select "Account" from the drop-down menu.
- Scroll down to the "Profile & Parental Controls" section and click on "Parental Controls."
- Enter your Netflix password.
- Select the profile you want to set up parental controls for.
- Choose the maturity level you want to set for that profile.
- Click "Save."
Types of Maturity Levels
Netflix offers four maturity levels for parental controls:
- Little Kids - suitable for children aged 12 and under.
- Older Kids - suitable for children aged 12 and older.
- Teens - suitable for children aged 15 and older.
- Adults - all content is available with no restrictions.
It is important to note that the maturity levels are based on the rating system used in each country. For example, a movie rated PG in one country may be rated G in another country.
How to Block Specific Shows or Movies
If there are specific shows or movies that you want to block, you can do so by following these steps:
- Log in to your Netflix account.
- Click on your profile picture in the top-right corner of the screen.
- Select "Account" from the drop-down menu.
- Scroll down to the "Profile & Parental Controls" section and click on "Parental Controls."
- Enter your Netflix password.
- Click on "Edit" next to "Blocked Titles."
- Enter the name of the show or movie you want to block.
- Click "Add."
How to Remove Parental Controls
If you want to remove parental controls, you can do so by following these steps:
- Log in to your Netflix account.
- Click on your profile picture in the top-right corner of the screen.
- Select "Account" from the drop-down menu.
- Scroll down to the "Profile & Parental Controls" section and click on "Parental Controls."
- Enter your Netflix password.
- Click on "Remove Profile."
Benefits of Using Parental Controls on Netflix
Using parental controls on Netflix has several benefits:
- It helps parents control what their children watch on the streaming service.
- It ensures that children only have access to age-appropriate content.
- It allows parents to set up individual profiles for each child.
- It helps families with children of different ages and interests manage their streaming experience.
Conclusion
Code Parental Netflix is a useful feature for parents who want to control what their children watch on the streaming service. Setting up parental controls is easy, and it allows parents to ensure that their children only have access to age-appropriate content. By using parental controls, families can manage their streaming experience and enjoy all that Netflix has to offer.
Related video of Code Parental Netflix: What You Need to Know About Parental Controls on Netflix
Clavo de olor, or clove, is a spice that is commonly used in cooking. However, it also has many benefits for hair health. In this article, we will discuss the uses and benefits of clavo de olor for hair.
What is Clavo de Olor?
Clavo de olor, also known as clove, is an aromatic spice that is often used in cooking. It is native to Indonesia, but is now grown in many parts of the world, including South America and Africa. The spice is made from the dried flower buds of the clove tree, and has a strong, sweet aroma and flavor.
Benefits of Clavo de Olor for Hair
Clavo de olor has many benefits for hair health. One of the main benefits is that it helps to stimulate hair growth. This is because the spice contains eugenol, a compound that improves blood circulation and promotes the growth of new hair follicles.
In addition to promoting hair growth, clavo de olor also helps to improve the overall health of the hair. The spice contains antioxidants, which help to protect the hair from damage caused by free radicals. It also has antimicrobial properties, which can help to prevent scalp infections and dandruff.
How to Use Clavo de Olor for Hair
There are several ways to use clavo de olor for hair. One of the easiest ways is to add a few drops of clove essential oil to your shampoo or conditioner. This will help to nourish and strengthen the hair, while also providing a pleasant aroma.
Another way to use clavo de olor for hair is to make a hair mask. To do this, mix a few drops of clove essential oil with a carrier oil, such as coconut oil or olive oil. Massage the mixture into your scalp and hair, and leave it on for 30 minutes before rinsing it off with warm water.
Precautions
While clavo de olor is generally safe to use for hair, it is important to use it in moderation. Using too much of the spice or essential oil can cause skin irritation and other side effects. It is also important to do a patch test before using clove essential oil, to make sure that you are not allergic to it.
In addition, pregnant and breastfeeding women should avoid using clavo de olor, as it may have negative effects on fetal development and milk production.
Conclusion
Clavo de olor is a versatile spice that has many benefits for hair health. From promoting hair growth to preventing scalp infections, this spice is a great addition to any hair care routine. However, it is important to use it in moderation and to do a patch test before using it on your hair.
Related video ofClavo de olor para el cabello: Benefits and Uses
Introduction
If you are an avid internet user, you might have found yourself opening multiple tabs on your browser at once. It can be a bit overwhelming, especially when you need to switch between them constantly. Fortunately, Google Chrome has a feature called “Groupe d'Onglet” or “Tab Group” in English, which can help you organize your tabs effectively.What is Chrome Groupe d'Onglet?
Chrome Groupe d'Onglet is a feature in Google Chrome that allows users to group tabs together into a single tab. This helps to keep your browser organized and makes it easier to find the tabs you need quickly. You can also label your tab groups to make them more identifiable.How to Use Chrome Groupe d'Onglet
Using Chrome Groupe d'Onglet is easy. First, open up your Google Chrome browser and right-click on a tab. From the dropdown menu, select “Add to new group.” You can then choose a color for your tab group and label it with a name.Benefits of Using Chrome Groupe d'Onglet
Chrome Groupe d'Onglet has several benefits. Firstly, it helps you to keep your browser organized and tidy. You can easily find the tabs you need without having to search through multiple tabs. Secondly, it helps to improve your productivity. With tab groups, you can focus on one group of tabs at a time, which can help you to work more efficiently.Customizing Your Tab Groups
You can customize your tab groups by changing their colors and labels. To do this, right-click on the tab group and select “Edit group.” You can then choose a new color and label for your tab group.Managing Your Tab Groups
You can manage your tab groups by right-clicking on a tab group and selecting “Group options.” From here, you can ungroup your tabs, close all tabs in the group, or move all tabs in the group to a new window.Syncing Your Tab Groups
If you use Chrome on multiple devices, you can sync your tab groups across all of your devices. To do this, you need to sign in to Chrome with your Google account. You can then enable syncing in the Chrome settings.Conclusion
Chrome Groupe d'Onglet is a great feature that can help you to organize your tabs effectively. With tab groups, you can keep your browser tidy and improve your productivity. So why not give it a try and see how it can help you?Related video of Chrome Groupe d'Onglet: Organize Your Browser Effectively
Netflix is a popular streaming service that offers a vast collection of TV shows and movies in different languages. With its wide range of content, it has become a go-to platform for entertainment enthusiasts around the world. However, as a viewer, you may want to change the subtitles on Netflix to understand the dialogues better, or simply because you prefer a different language. In this article, we will guide you on how to change the subtitles on Netflix.
Step-by-Step Guide to Change Subtitles on Netflix
Here is a step-by-step guide on how to change the subtitles on Netflix:
Step 1: Log in to Your Netflix Account
The first step is to log in to your Netflix account. You can do this by visiting the Netflix website or opening the Netflix app on your mobile device or smart TV. Enter your login credentials to access your account.
Step 2: Choose a TV Show or Movie
Once you have logged in to your account, choose a TV show or movie that you want to watch. You can browse through different genres, or search for a specific title using the search bar.
Step 3: Start Playing the TV Show or Movie
After selecting a TV show or movie, click on the play button to start streaming. Once the video starts playing, you will see the subtitles at the bottom of the screen.
Step 4: Click on the Subtitle Icon
To change the subtitles, click on the subtitle icon located at the bottom right corner of the screen. It looks like a dialogue bubble with the letter "S" inside.
Step 5: Choose Your Preferred Language
After clicking on the subtitle icon, a menu will appear with different language options. Choose your preferred language from the list, and the subtitles will automatically update.
How to Customize the Subtitle Appearance on Netflix?
If you want to customize the subtitle appearance on Netflix, follow these steps:
Step 1: Log in to Your Netflix Account
Log in to your Netflix account using your login credentials.
Step 2: Go to Your Account Settings
Click on the profile icon located at the top right corner of the screen and select "Account" from the drop-down menu. This will take you to your account settings.
Step 3: Choose Your Profile
Select the profile for which you want to customize the subtitle appearance. If you have multiple profiles, make sure to select the right one.
Step 4: Click on "Subtitle Appearance"
Scroll down to the "Profile & Parental Controls" section and click on "Subtitle Appearance."
Step 5: Customize the Subtitle Appearance
Here, you can customize the font, text size, and color of the subtitles. Once you have made the desired changes, click on "Save" to apply the changes.
Conclusion
Changing the subtitles on Netflix is a simple process that can be done in a few clicks. Whether you want to understand a foreign language movie or prefer to watch with subtitles in your native language, Netflix offers a wide range of subtitle options. Additionally, you can customize the subtitle appearance to make your viewing experience more enjoyable. With this guide, we hope you were able to change the subtitles on Netflix with ease.
Related video of Changer Sous Titre Netflix: How to Change the Subtitles on Netflix?
Gmail est l'un des services de messagerie les plus populaires dans le monde entier. Si vous utilisez Gmail, vous avez peut-être remarqué que chaque courrier électronique que vous envoyez comprend une signature par défaut. Cependant, vous pouvez personnaliser votre signature et la modifier en fonction de vos besoins. Dans cet article, nous allons vous montrer comment changer la signature sur Gmail.
Étape 1 : Connectez-vous à votre compte Gmail
Tout d'abord, vous devez vous connecter à votre compte Gmail en utilisant vos identifiants de connexion. Si vous n'avez pas de compte Gmail, vous pouvez en créer un gratuitement en visitant le site web de Gmail.
Étape 2 : Accédez aux paramètres de votre compte
Une fois que vous êtes connecté à votre compte Gmail, vous devez accéder aux paramètres de votre compte en cliquant sur l'icône de roue dentée en haut à droite de l'écran. Dans le menu déroulant qui apparaît, sélectionnez "Paramètres".
Étape 3 : Accédez à la section "Signature"
Une fois que vous êtes dans les paramètres de votre compte, accédez à la section "Signature" en faisant défiler jusqu'à la section "Général". Dans cette section, vous pouvez ajouter, modifier ou supprimer votre signature.
Étape 4 : Modifiez votre signature
Pour modifier votre signature, il vous suffit de saisir le texte que vous souhaitez inclure dans la zone de texte. Vous pouvez ajouter des images, des liens et même des graphiques à votre signature. En outre, vous pouvez utiliser des polices et des couleurs différentes pour personnaliser votre signature.
Étape 5 : Enregistrez vos modifications
Une fois que vous avez modifié votre signature, n'oubliez pas d'enregistrer vos modifications en cliquant sur le bouton "Enregistrer les modifications" en bas de la page. Votre nouvelle signature sera alors automatiquement ajoutée à tous les courriels que vous enverrez à l'avenir.
Conseils pour personnaliser votre signature sur Gmail
Voici quelques conseils pour personnaliser votre signature sur Gmail :
- Utilisez une police et une couleur qui correspondent à votre personnalité ou à celle de votre entreprise
- Ajoutez des liens vers vos comptes de réseaux sociaux ou votre site web
- Incluez des images ou des graphiques pour rendre votre signature plus attrayante
- Assurez-vous que votre signature est claire, concise et facile à lire
Conclusion
En suivant les étapes simples décrites dans cet article, vous pouvez facilement changer votre signature sur Gmail. N'oubliez pas de personnaliser votre signature pour qu'elle corresponde à votre personnalité ou à celle de votre entreprise. Avec une signature personnalisée, vous pouvez ajouter une touche personnelle à tous vos courriels et rendre votre communication plus professionnelle.
Related video of Changer la signature sur Gmail
Android devices are known for their flexibility, customization, and user-friendliness. One of the key features that make Android so popular is the ability to change the keyboard. In this article, we will guide you through the process of changing the keyboard on your Android device.
Why Change Your Keyboard?
There are several reasons why you might want to change your Android keyboard:
- You prefer a different layout or design
- You need a keyboard that supports a different language
- You want to improve your typing speed and accuracy
- You want to use a keyboard with more features and customization options
Types of Android Keyboards
There are several types of keyboards available for Android devices:
- Stock keyboard: This is the default keyboard that comes with your Android device. It is usually basic and lacks customization options.
- Third-party keyboard: These are keyboards that you can download from the Google Play Store. They offer more features and customization options than the stock keyboard.
- Custom ROM keyboard: If you have installed a custom ROM on your device, it may come with its own keyboard.
How to Change Your Keyboard
Here are the steps to change your keyboard on an Android device:
- Open the Settings app on your device.
- Scroll down and tap on "System."
- Tap on "Languages & input."
- Tap on "Virtual keyboard."
- Select the keyboard you want to use.
- If you want to edit the settings for the keyboard, tap on the gear icon next to it.
- You may need to enable the keyboard first if it is not already enabled.
Customizing Your Keyboard
Once you have selected a new keyboard, you can further customize it to your liking. Here are some common customization options:
- Keyboard layout: You can choose between QWERTY, AZERTY, and other layouts.
- Theme: You can choose a theme that matches your style.
- Language: You can add additional languages that the keyboard supports.
- Auto-correction: You can enable or disable auto-correction and adjust its sensitivity.
- Gesture typing: You can enable gesture typing, which allows you to swipe your finger across the keyboard to type words.
- Word prediction: You can enable or disable word prediction and adjust its accuracy.
Best Android Keyboards
There are many great Android keyboards available on the Google Play Store. Here are some of the best:
- Gboard: This is Google's official keyboard. It offers great features like gesture typing, voice typing, and integrated search.
- SwiftKey: This keyboard is known for its excellent word prediction and customization options.
- Fleksy: This keyboard is designed for speed and accuracy.
- Grammarly Keyboard: This keyboard offers advanced grammar and spell-check features.
- Chrooma Keyboard: This keyboard changes its color based on the app you are using.
Conclusion
Changing your Android keyboard can greatly enhance your user experience. Whether you want to improve your typing speed, customize your keyboard, or use a keyboard that supports a different language, there is a keyboard out there for you. Follow the steps outlined in this article to change your keyboard and start typing away!